

Quick Answer: How to Add a New User to Your Google Business Profile (3-Step Guide)
To immediately add a new user or manager to your Google Business Profile, you must use the "People and access" settings within your In-Search Experience (ISE) management panel.
Here is the fastest, most direct 3-step process.
The 3-Step Process for Adding a New User
- Activate the In-Search Management Panel
Log in to the Google account that is the Owner of the profile. Search your exact business name on Google. Your business management panel will appear at the top of the search results. - Go to 'People and access'
In your management panel, click the three-dot menu. From the dropdown, select 'Business Profile settings'. In the new window, click 'People and access'. - Invite and Assign the Role
Click the 'Add' button (the person icon with a plus sign). Enter the new user’s Gmail or Google Workspace email address. Select their role (e.g., 'Manager') and click 'Invite'.
Here's the most important part: new users can't get in until they accept the email invite you send them. For most people or agencies you add, we suggest using the 'Manager' role. It gives them the power to run the profile, but they can't delete users or claim ownership.
What You Will Learn
- User Roles & Security: Critical differences between Primary Owner, Owner, and Manager permissions.
- Agency Access Best Practice: Why the Manager role is mandatory for all external agencies and consultants.
- Role Management: Step-by-step instructions for adding, removing, changing, and safely transferring Primary Ownership(including the 7-day wait).
- Agency Onboarding: Two methods for requesting client access, including the advanced Business Group ID workflow.
- Troubleshooting Access Issues: Solutions for common problems like Workspace conflicts, locked requests, and recovering access after a suspension.
- Security Mandates: The necessity of 2-Step Verification (2SV) and Google's rule for the actual business owner to always retain Primary Owner access.
Understanding the GBP User Roles: Owner vs. Manager Permissions
Assigning the correct user role is the single most important part of securing your Google Business Profile. Granting the wrong level of access, even by accident, can result in the complete loss of your profile.
The two main roles you will use are Owner and Manager. While they may sound similar, their permissions are critically different.
Here is a detailed breakdown of the three user roles and their capabilities.
| Role | Key Permissions & Capabilities | Security Warning & Best Practice |
|---|---|---|
Primary Owner | Total control: This role has every possible permission.
| Retention Mandate: The actual business owner must always retain Primary Owner access. Never make an external agency or employee the sole Primary Owner. |
Owner | Full management control: This role is for trusted individuals.
| Use with Extreme Caution: An Owner can promote another user to Primary Owner (after a 7-day waiting period). Only grant this role to a co-owner or highly trusted internal partner. |
Manager | Daily management permissions: This is the standard "editor" role.
| This is the recommended role: for all third parties, including your marketing agency, consultants, and most internal employees. It gives them the access they need to do their job without risking your profile's security. |
The Official Recommendation: Why You Must Use the 'Manager' Role for Agencies
When giving access to an external partner, agency, or employee, always use the 'Manager' role.
A user with 'Owner' access has the power to remove other users and, after a 7-day waiting period, can even take actions to transfer Primary Ownership. The 'Manager' role completely removes this risk, as a Manager has zero permissions related to user management. This protects your business, keeps you in control, and allows your partners to focus on marketing, not administration.
The Owner’s Guide to Granting Access (Individuals and Teams)
As the business owner, you are the gatekeeper of your Google Business Profile. Granting access is a necessary part of delegating your marketing, but it must be done with security and control as your top priorities.
This guide provides the step-by-step process for managing your team and agency partners, ensuring you never put your profile ownership at risk.
Step 1: Navigating to “People and access” via Google Search (The ISE Flow)
Your Business Profile is no longer managed through a separate dashboard. Instead, you manage it directly from Google Search in what is called the In-Search Experience (ISE).
- Log in to Your Owner Account. Open https://www.google.com/search?q=Google.com or the Google Maps app. You must be signed in to the Google account that is the Owner or Primary Owner of the profile.
- Search for Your Business. In the search bar, type your exact business name.
- Find Your Management Panel. At the top of the search results, you will see your private management panel. (This panel is only visible to you and other managers).
- Open Profile Settings. Click the three-dot menu (⋮), which is typically next to your profile icon.
- Select 'Business Profile settings' A new window will pop up.
- Click 'People and access'. This is your hub for all user management.
Step 2: Sending the Invitation and Assigning the Correct Role
Once you are in the "People and access" menu, follow these steps to invite a new user.
- Click the 'Add' button (it looks like a person icon with a plus sign).
- Enter the Gmail or Google Workspace email address of the person you are inviting.
- Assign the Role. This is the most critical security step.
- For Agencies, Consultants, or Employees: ALWAYS choose 'Manager'. This role provides all necessary permissions for daily management (posts, photos, info editing) without any ability to add or remove other users.
- For a Trusted Co-Owner: Choose 'Owner'. Use this permission with extreme caution.
- Click 'Invite'.
The person will receive an email and must click a link inside to accept the invitation. Their status will show as "Pending" in your 'People and access' list until they accept.
How to Remove or Change a User’s Access
It is critical to conduct regular audits and promptly remove access from former employees or agencies.
To Remove a User:
- Navigate to the 'People and access' settings using the steps above.
- You will see a list of everyone who has access.
- Click on the name of the user you wish to remove.
- Select 'Remove [user]' (often represented by a trash can icon).
- Confirm the removal. Their access will be revoked immediately.
To Change a User's Role:
- In the 'People and access' list, click on the user's name.
- Click on their current role (e.g., "Owner").
- A menu will appear, allowing you to select a different role.
- Select the new role (e.g., downgrading an 'Owner' to a 'Manager') and click 'Save'.
Critical Security: How to Safely Transfer Primary Ownership
Transferring Primary Ownership is the highest-level, highest-risk action you can take. It means you are giving another user the "master keys" to the profile, including the ability to remove you. Only do this if you are selling the business or permanently handing over control.
The 7-Day Security Waiting Period
You cannot transfer Primary Ownership to a new user. To enhance security, a user must first be an 'Owner' for a minimum of 7 full days before Google will allow them to be promoted to 'Primary Owner'.
The Transfer Process:
- Add the User as an 'Owner'. If the user is not already an 'Owner' on the profile, you must first invite them as an 'Owner' (see Step 2).
- Wait 7 Days. You must wait a full seven days after they have accepted the 'Owner' invitation.
- Promote to Primary Owner. After the waiting period, return to the 'People and access' settings.
- Click on the name of the 'Owner' you wish to promote.
- You will now see the option to'Transfer Primary Ownership'.
- Select this option and follow the on-screen confirmations. This change is immediate and irreversible without the new Primary Owner's cooperation.
The Agency’s Guide to Requesting Access (Client Onboarding)

For agencies, consultants, and marketing professionals,your client onboarding process must be professional, secure, and efficient. Fumbling with access requests looks amateurish and can delay your work.
There are two primary methods for gaining access to a client's Google Business Profile. The method you choose depends on your agency's scale and your client's technical comfort.
Method A: Manual Access Request (Individual Account Workflow)
This is the standard, one-off method best suited for freelancers or agencies managing only a few clients. It uses your individual Google account to send a request that the client must approve.
Step-by-Step Guide:
- Use a Professional Account. Log in to the Google account you use for your business (e.g., your.agency@gmail.com).
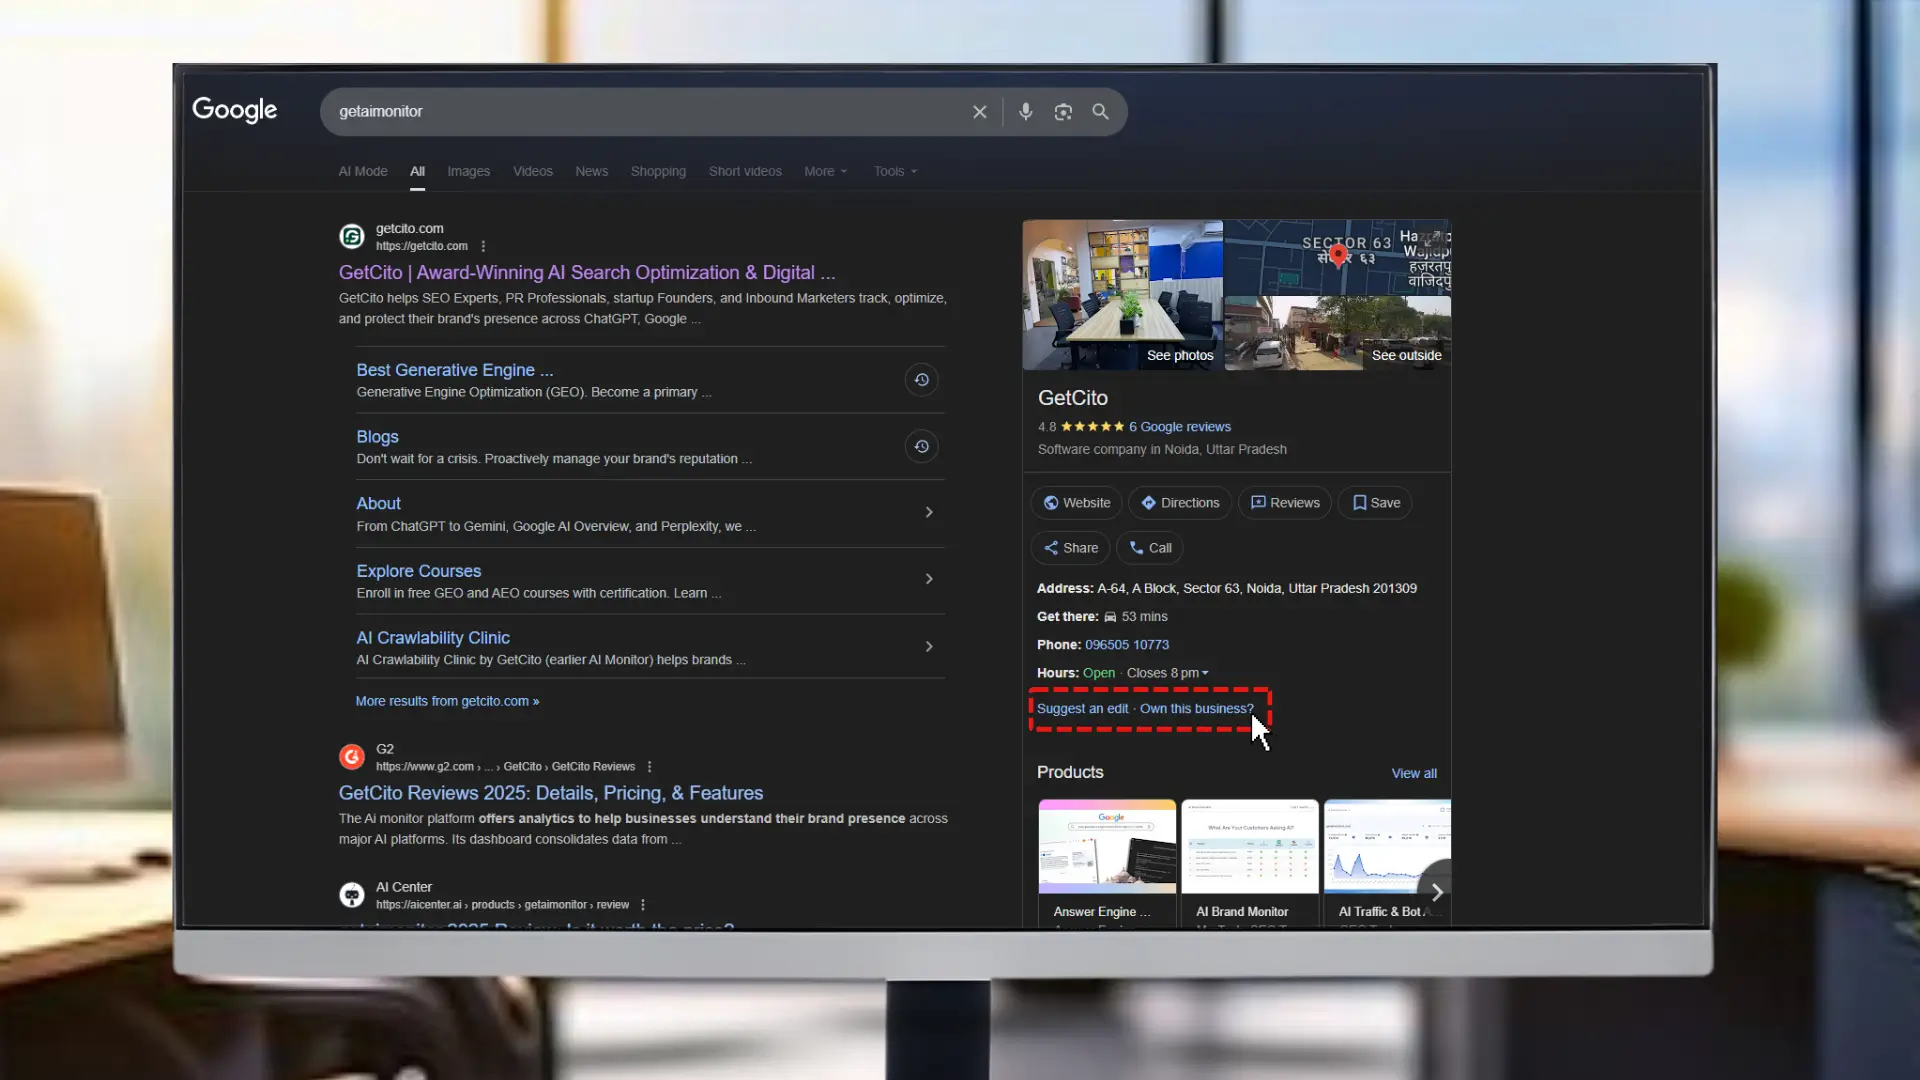
- Find the Business. Go to Google Maps or Google Search and find the client's exact Business Profile.
- Initiate the Request. On the profile, look for a link that says "Own this business?" or "Manage this profile" Click it.
- Click "Request Access". Since the profile is already claimed by your client, Google will show you that it is managed by another email. Click the "Request access" button.
- Fill Out the Form. You will be asked to provide your name, phone number, and relationship to the business.
- Level of access: Always select "Manager".
- Relationship: State "I manage this profile on behalf of the owner" or "Agency representing this business."
- Submit. The current profile owner (your client) will receive an email with your request.
Pros vs. Cons of This Method
- Pro: It's a simple process that doesn't require a complex setup.
- Con: It is slow and unreliable. The client has only 3 days to respond to the email, which can be easily missed or sent to spam. If they deny or ignore it, you must start over.
Method B: Using a Google Organization / Business Group ID
This is the advanced, scalable, and most professional method for agencies. It involves setting up a "Business Group" (formerly a Location Group) within your agency's Google Business Profile Manager dashboard.
Instead of requesting access, you provide the client with your Business Group ID, and they add you directly. This is instant, secure, and positions you as an organized, professional partner.
How to Find Your Business Group ID:
- Set Up Your Agency Dashboard. If you haven't, go to business.google.com/agencysignup to create an agency-level Organization account.
- Create a Business Group. Inside your Business Profile Manager dashboard, create a "Business Group" (e.g., "Agency Clients").
- Find the ID. Navigate to the settings for that Business Group. You will see a "Business Group ID" or "Location Group ID," a unique string of numbers.
- Copy this ID. This ID is the key to your entire workflow.
How to Invite Someone Using a Business Profile Group ID
This is the most critical part of the agency workflow. The phrasing is a bit misleading you don't "invite" with the ID. Instead, you provide the ID to your client with clear instructions on how to add your agency.
Send the following instructions to your client (the Profile Owner) to streamline their onboarding.
Client Onboarding Email Template
"To grant our agency management access to your Google Business Profile, please follow these 5 steps. This method is the most secure and is recommended by Google.
- Log in to the Google account that is the Owner of your Business Profile.
- Search your business name on Google to open the management panel.
- Click the three-dot menu (⋮) --> 'Business Profile settings' --> 'People and access'.
- Click the 'Add' button. In the "Add user" box, paste our agency'sBusiness Group ID:
[YOUR-BUSINESS-GROUP-ID-HERE] - Our agency's name will pop up. Select it, choose the 'Manager' role, and click 'Invite'."
Once they do this, you will see and accept the invitation in your "Manage invitations" tab within your agency's Business Profile Manager dashboard.
Why Can't I See My GBP Dashboard? High-Value Technical Solutions
Losing the ability to view or edit your Google Business Profile (GBP) dashboard is a frustrating, high-intent failure point. This issue often results from one of three core conflicts: aWorkspace email incompatibility, a profile that has been locked down due to excessive access requests, or a loss of administrative control following a GBP suspension.
Here are three high-impact fixes for the most common GBP access problems.
Fix 1: The Workspace Conflict - Can't See the Dashboard with a Corporate Email
One of the most frequent technical roadblocks occurs when your original profile was claimed by a personal Gmail account, and you are now trying to manage it using a corporate email tied to Google Workspace.
In this common scenario, the Workspace account often receives notifications and even appears to have some limited administrative ability, yet the full, actionable GBP editing dashboard remains invisible or displays error messages. This happens because Workspace accounts sometimes conflict with the profile's original ownership structure or security settings.
The Unique Fix: Explicit Re-Addition
The critical solution is not to continue requesting access with the Workspace email. Instead, you must:
- Log in to the original, working personal Gmail accountthat successfully claimed the profile.
- Navigate to the Google Business Profile dashboard settings.
- Go to the Users and Access section.
- Explicitly re-add the Workspace email and grant it Manager or Owner permissions. This process bypasses the automated request conflict.
Ancillary Troubleshooting
If access is still denied after re-addition, try these steps:
- Clear Browser Cache: Completely clear your browser’s cache and cookies.
- Use Incognito Mode: Attempt to access the dashboard using an Incognito or Private browsing window to rule out conflicting extensions or session data.
- Workspace Admin Console: If you're the Workspace admin, check your security settings. You're looking for any rules or conflicting services (like Google Sites restrictions) that might be the culprit for blocking the GBP service.
Fix 2: Access Request Denied or Locked? The 3-Day/3-Request Limit Escalation
Here's a critical warning: If a profile is already claimed, do not submit multiple access requests. You can easily get the page "locked." Once Google's system sees too many ownership claims, it will often freeze all new requests. This completely halts the standard 3-day verification path, and you'll be stuck.
This denial means the automated system has stalled, and you must escalate the issue manually.
Guidance on Escalation and Proof
Immediately shift your strategy from submitting automated requests to contacting Google Supportdirectly.
- Stop Submitting Requests: Do not submit any more access requests, as this can delay resolution.
- Identify Support Channel: Use the official Google Business Profile Support contact form to detail your situation.
- Provide Verifiable Proof of Affiliation: The only way to win this is to provide ironclad proof that you are the real business owner. Google Support needs to see documentation that unmistakably links you (or your corporate email) directly to that physical business address.
- Required Proof Examples: Current business registration or articles of incorporation, utility bills (gas, electric, phone) in the business name at the exact location address, or tax forms.
This is a critical, high-intent step that requires clear, documented proof to unlock the profile.
Fix 3: Recovering Lost Access After a GBP Suspension or Violation
Did your access suddenly disappear after a recent email alert regarding a guideline violation? Your profile is likely soft-suspended; this results in a temporary loss of all admin privileges. Your dashboard will stay hidden until the specific violation is fixed.
The Necessary Steps: Compliance and Reinstatement
To restore visibility and access, you must follow this strict, two-step sequence:
Step 1: Get Your Profile Compliant Now: First, stop! Before you submit anything, you need to comb through the Google Business Profile Guidelines for your specific category. You must fix every single violation on your profile, from inaccurate services and misleading hours to any forbidden keyword stuffing in your business name.
Step 2: Submit a Reinstatement Request: Only after the profile is fully compliant should you submit a formal request for reinstatement.
The Appeals Tool and the 60-Minute Evidence Window
Google uses a specific process for appeals:
- Utilize the Appeals Tool: Use the official Google Business Profile Appeals Tool(or Reinstatement Request form) to submit your case.
- Attach Evidence Immediately: After submitting the initial appeal form, you will often receive an immediate email confirmation with a case number. Pay attention to the tight deadline: Google frequently provides a strict 60-minute windowto reply to that email and attach supplementary evidence (photos of signage, business documents, etc.). Missing this window can delay your appeal significantly.
Lost access due to suspension requires a policy-first approach; fixing the compliance issue is the prerequisite for visibility.
The Google Third-Party Policy: Owner Access and Mandated Retention
Access control isn't just about troubleshooting; it's a critical aspect of security and compliance, especially when working with external agencies or new staff. The following points integrate the non-negotiable security requirements and Google's Third-Party Policy directly into your access management strategy.
Enforcing 2-Step Verification (2SV) for All High-Value Users
To protect against account takeover, phishing, and unauthorized modifications, Google mandates stringent security measures for profile administrators.
- Non-Negotiable Requirement: Ensure every user (especially Owners and Managers) with high-value access to the GBP dashboard has 2-Step Verification (2SV) enabled on their Google account. This is the single most effective way to prevent unauthorized access.
- Security Lockout: In certain high-security or high-fraud risk regions, Google may automatically remove a user's access or revoke a newly issued invitation if 2SV is not active on their linked Google Account. Confirming 2SV is the first step before sending an invitation.
The Owner Retention Mandate and Third-Party Policy Enforcement
If you are a business owner working with a third-party agency or SEO consultant, Google's policy is explicit regarding access hierarchy.
- Mandated Owner Retention: The actual business owner must always retain Primary Owner-level access to the GBP dashboard. Agencies should typically be granted Manager or Owner roles, but never Primary Owner status. Violating this policy can lead to profile suspension.
- Beware of Scams: You must be on high alert for anyone impersonating Google. Here's the number one rule: Google will never call, email, or text you asking for a One-Time Password (OTP) or Verification PIN. This is especially true after you've already granted an agency access. Any unexpected request for a PIN or OTP, especially via a call or text, is a clear phishing attempt to steal your profile.
Post-Invitation Checklist: Confirming the New User is Live and Functioning
After successfully sending an access invitation, it's crucial to confirm the new user has accepted the role and can execute tasks necessary for the business.
- Verify Invitation Acceptance: Log in as the Primary Owner and go to Users and Access. The new user's status should change from Invited to the assigned role (Manager or Owner) immediately upon their acceptance.
- Role Confirmation Check: Have the new user access the profile. Check that they can see the full dashboard and that their assigned role (visible underPeople and access) is correct.
- Functionality Test: Confirm they can perform high-value actions required by their role:
- Can they post? (Create a standard update post.)
- Can they reply? (Respond to a recent customer review.)
- Can they edit? (Make a minor correction to business hours.)
If any high-value functionality is blocked, ensure their 2SV is active and that your corporate email/Workspace integration is stable (refer back to Fix 1).